
In-Depth Track Visit: Virginia International Raceway (VIR)
Virginia International Raceway (VIR)
![]()
Location: Alton, VA (Map)
Opened: Aug 1957
Distance: 3.27 Miles
Turns: 17

The Layout:

Video:
Track Day Checklist:
- Oil - Bring an extra quart
- Trans / Diff Fluid - Make sure to have fresh fluid
- Brake Pads - Make sure to have fresh pads or swap to a track compound at the track, ensure rotors have sufficient thickness
- Wheels / Tires - Make sure to have ample thread and no damage to tire or wheel
- Steering / Suspension - Make sure everything is fucntioning correctly and nothing is loose
- Engine - Make sure it is running correctly and is not leaking any fluids
- Safety Equipment - Comply with event and track rules (Snell helmet typically needed)
- Glass Cleaner - Bring in case you get debrit and dirt obstructing view
- Wax - Put a coat of wax on the front bumper, fenders, and around the wheel wells for easy clean up
- Tire Gauge - Check tire temps before and after sessions
- Basic Tools
- Rags / Towels
Driver's Guide:
Brought to you by Oleg Pudeyev.of WinHPDE.

Turn By Turn
Turn 1
This is a long and pretty slow right hander following the main straight.
Drivers tend to lift on the main straight before their true braking point for turn 1; an easy gain is staying on full power until the braking point, starting to brake hard and immediately shifting attention toward the inside of the turn, looking for the apex.
Less experienced drivers tend to turn in too early, which causes them to run out of pavement before the corner finishes. When executing a "traditional" entry (that is, without trailbraking), it is important to go deep into the pavement on the left before starting the turn.
The two principal lines through turn 1 are a late apex line and a trailbraking line. The late apex line may be fastest for high horsepower cars, and is a good safe choice while learning the track:
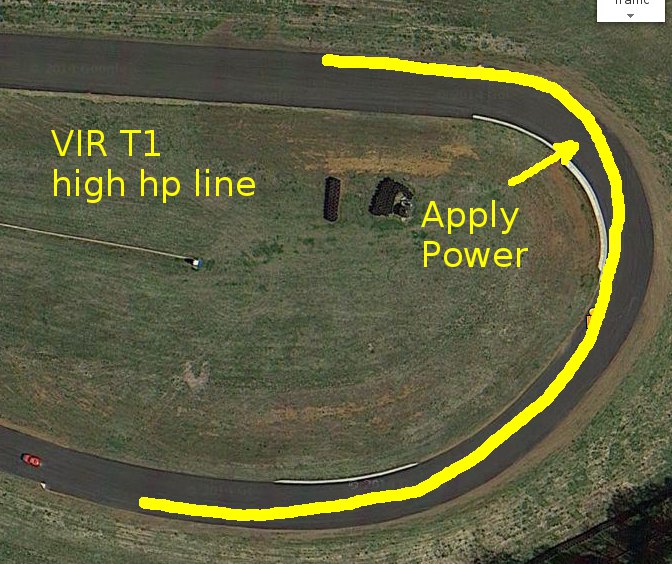
The goal of the late apex line is to be on power as early as possible. This requires slowing down significantly and going in very deep. The apex point should be no earlier than the end of the inside curbing.
The more aggressive your entry into turn 3, the more you will benefit from getting on power early, thus increasing your exit speed, in turn 1.
Low power cars may find the trailbraking line fastest:
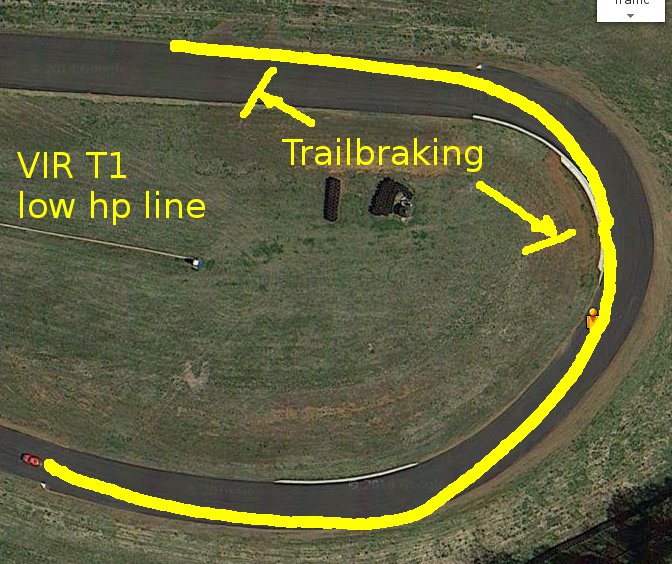
This line comes with much higher entry speed which is being scrubbed all the way until the apex. The apex itself is somewhere in the second half of the inside curbing. Once you are comfortable with trailbraking into this turn you can start braking significantly later, because trailbraking - due to weight transfer - will make the car turn much better through the first half of the turn, permitting still higher entry speed.
You may have noticed that cars on the trailbraking line will track out much earlier than cars on the late apex line.
Turn 2
This is a transition corner. The line through turn 2 is largely dictated by the approach to turn 3, but at the same time the car must move from track left as it exited turn 1 to track center or track right somewhere in turn 2.
Turn 3
The character of this turn changed dramatically with the 2014 repave, with the turn becoming much faster and thus demanding much less braking. However the line remains roughly the same as it was before.
The two principal approaches to turn 3 is a straight line and a curve. The straight line approach is as follows:
When you are at the apex of turn 2 the car should be aiming at - or facing - the corner station in turn 3. This requires coming pretty far right between turns 1 and 2. With the car aimed at the corner station, drive straight until the car arrives at the right edge of the track; turn in for turn 3 then.
Some cars will not need to come out all the way to the right edge of the pavement for turn 3 entry.
The alternative is approaching in an arc:
In this approach the car would normally miss the apex in turn 2 and arrange to be much closer to the right edge of the track early. The advantage of the arc line is the smoother entry for turn 3; the disadvantage is that braking must be done in a curve, whereas the straight line offers a straight braking zone.
Many drivers coast on the entry to turn 3. The solution to this is to have a good reference point for when to begin braking; I suggest using the inside curb in turn 2 for this purpose.
After the repave turn 3 became much faster because its exit became a lot wider. Most cars will fit entirely on the pavement right of the exit curb; using this pavement extension yields a dramatic change in the curvature of the turn.
Turn 4
This is a slow and tight left hander. The goal in turn 4 is to set up properly for the snake (turns 5-6).
Most cars will want to exit turn 4 on the left edge of the track which requires foregoing the traditinal line in turn 4 entirely. The line is normal on the entry but with a much lower speed than in a typical corner, so that the car tracks out very little past the apex as the driver continues to turn left and move over on the left side in preparation for turn 5.
Low power and high grip cars can enter turn 4 relatively quicker and track out a bit more, provided they can still make it to the left edge in time for turn 5.
Turns 5a-5b
This sequence of turns 5a-5b-6a-6b is also known as the Snake, and to me this is one of the best parts of VIR.
For most cars the turn in point for the Snake is the end of the outside curb between turns 4 and 5a. Many cars would reach the outside edge of the pavement several feet before the curb ends; the correct thing to do is to straighten the steering wheel for half second to a second and wait until the end of the curb to turn in, rather than maintaining constant steering angle and entering 5a too early. That said, low power and high grip cars can sometimes get away with turning in before the curb ends.
Cars with strong understeer, especially under power, may find their front end washing out before the apex of 5a, resulting in missed apex. In these cars it's OK to turn earlier, before the curb on the outside ends, to compensate for understeer. Turn 5a is cambered and being off at its apex tends to make the front wash out even more due to camber loss.
The radius of the subsequent corners is steadily increasing, permitting most cars to accelerate close to flat out through the snake. Cars which have more power than grip may need to momentarily lift when changing direction for turn 5b, and may benefit from doing the same when entering 5a.
Turns 6a-6b
For optimal lap time turns 6a and 6b should be taken under full power. Adjust the line and attitude of the car in 5a and 5b to make this possible.
Larger and more powerful cars frequently have a hard time fitting into the pavement in 6a and 6b. In these cases I apply the aggressive curb cutting line through esses to turn 6a which is the left hander. The left edge of the left front tire would be even with the left edge of the inside curb in 6a, typically under full power; I generally do not use the inside curb in 6b.
Turns 7-8-9
This sequence of turns, also known as the Climbing Esses, is in my opinion the most exciting feature of VIR.
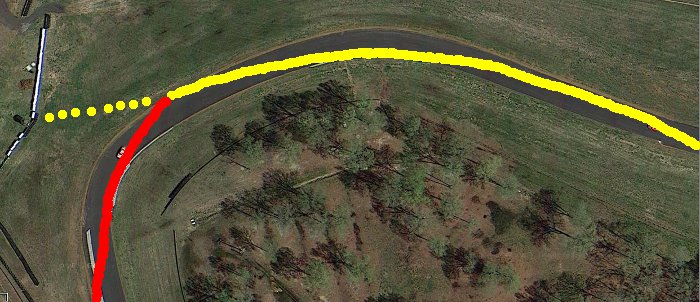
Drivers learning the track should start with a late apex line through each of these corners. Here is a diagram of the late apex line for turn 7:
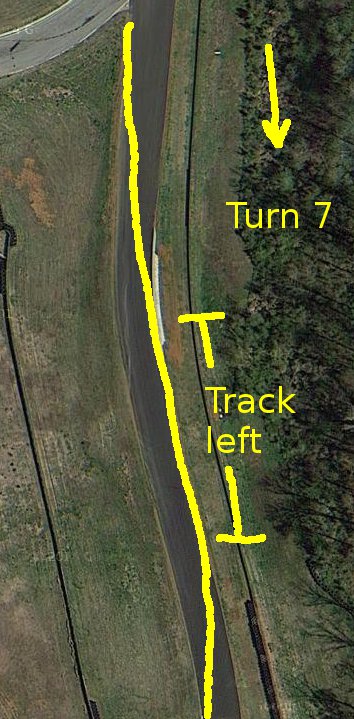
The car should just about hug the left side of the track from the apex until the turn in point for turn 8. Run similar lines in turns 8 and 9. This is not visible on the overhead map but correct execution of a late apex line like this should result in the car cresting each hill with barely any steering input, which is what you want to be happening. A bit of steering input is likely to remain but the steering wheel should be getting unwound as the car is cresting. Maintaining constant, substantial steering angle over any of the crests is dangerous.
With more experience, stop hugging the edge of the track and just touch it at a single point between the turns. This line corresponds to higher speed through this complex as well.
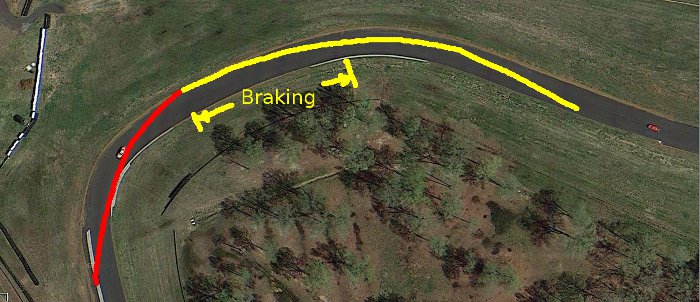
How experienced drivers traverse the Climbing Esses varies greatly on the power level of their car. In low horsepower cars the esses are usually entered without braking with an entry speed of low triple digits, and taken under full power. Medium horsepower cars may enter the esses without braking but would be off throttle or only partially applying throttle through them, thus bleeding speed off through the turns. High horsepower cars, especially those with limited grip, would brake for turn 7 and often continue bleeding speed off through turn 8.
I like cutting the entire inside curb in turn 8a while straight lining that turn. Conceptually this is similar to the aggressive curb cutting line through esses mentioned in turn 5, except driving in a straight line is what really makes this line work in turn 8. At the speeds with which Climbing Esses are taken, going over curbs with steering angle is highly risky; I thus stay off curbs in 7, 8b and 9 and use the entire curb in 8a while also straightening 8b.
Turn 8a
This is a right hander.
If you are going to use curbs in the climbing esses, I suggest you cut the entire curb in 8a and no other curbs. Following this approach, right front tire should be partially hanging off the right edge of the inside curb in turn 8a.
Turn 8b
A left hander.
Using the apex curb in this turn is often unnecessary because turn 9 is more open, and hence the car would fit into turn 9 even without using the curb in turn 8b. That said, high power and grip challenged cars may benefit from using the apex curb in 8b.
Turn 9
Unlike turn 7-8 sequence where turn 8 is tighter than turn 7, turn 9 is more open than turn 8. In most cars turn 9 should be taken under partial to full throttle. Due to the required setup for turn 10 tracking out completely in turn 9 is not beneficial; still, many cars can take turn 9 under power ending up about track center between turns 9 and 10 with time remaining to bring the car over on the right side and apply gentle braking for turn 10.
A good rule of thumb is the car should never be traveling in a straight line between turns 9 and 10 until the braking zone for turn 10. If you find yourself traveling in a straight line like that, increase throttle input through turn 9.
Turn 10
A very fast, downhill left hander. The keys to executing turn 10 well are car positioning on entry and vision. It is important to turn in from extreme track right to maximize effective curve radius and, thus, speed; this requires preparing for turn 10 entry while still in and exiting turn 9.
Turn 10 used to be somewhat deceptive with an apex that appeared later than it was. Part of the issue I believe was limited surface grip which induced understeer in most cars. After the repave there is no shortage of grip in turn 10, but vision techniques are still useful for taking turn 10 at maximum speed.
When approaching the turn, you should be looking for the apex on the left. You want to see the apex as soon as it physically appears in your line of sight, which should happen around the turn in point. Focus on the apex as you are adding steering input. When you are certain you are going to hit the apex, look for the track out point. For less experienced or less aggressive drivers, the track out point would be the curb at corner exit. For more experienced and more aggressive drivers it would be the edge of the pavement a few feet past the end of the curb. Use the entire track width for optimum lap time.
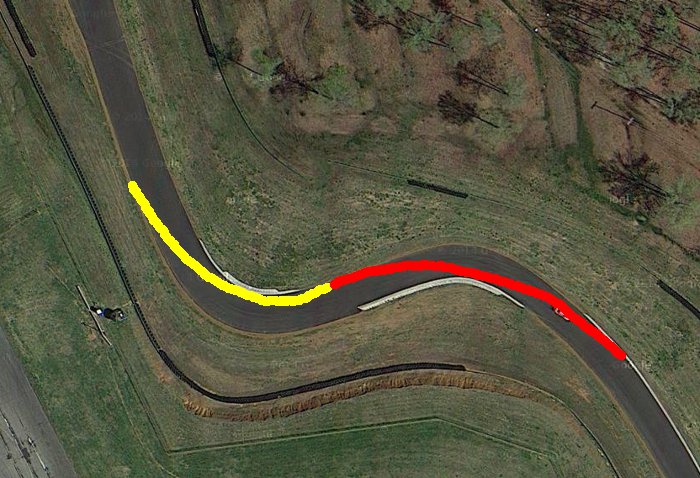
Turn 11
The first turn of the oak tree combination, some people treat turn 11 as a throwaway corner but substantial time can still be given up in it. Turun 11 is an entry speed corner - the goal is to preserve the speed on the short straight between turns 10 and 11 for as long as possible, and thus to brake as late as possible. The line and attitude of the car between turns 11 and 12 determines precise braking point for each car.
Turn 11-12 sequence is similar to the turn 2-3 sequence in that some braking is needed and the car is never really traveling in a straight line. As such, the way a driver would take the 2-3 sequence is often similar to how they would take the 11-12 sequence: cars with stronger understeer tendencies can brake later, harder and while turning more, while neutral cars and cars prone to oversteer might prefer to brake earlier, gentler and in more of a straight line.
The very short straight between turns 11 and 12 is nonetheless long enough for some cars to apply throttle; I imagine most if not all of such cars would be faster overall had they braked later in turn 11 and took turn 11 quicker instead.
The most crucial part of turn 11, of course, is completely tracking out and settling the car for turn 12.
Turn 12
The oak tree turn is the most important turn on the track for lap time, being followed by the enormously long back straight. It is also a tricky turn to master.
There are three principal approaches to turn 12: a smooth arc through turns 11 and 12, running a short straight between turns 11 and 12 and straightening turn 11.
The smooth arc through turn 11 looks like this:

Most cars end up missing the apex in turn 11 so that they are on the left side of the pavement, parallel to the track, as they are approaching the turn in point for turn 12. This approach is generally the smoothest of the three - the car is decelerating through turn 11 with perhaps some maintenance throttle between 11 and 12.
An alternative to the smooth arc is to segment turn 11 into two somewhat straight lines, like so:
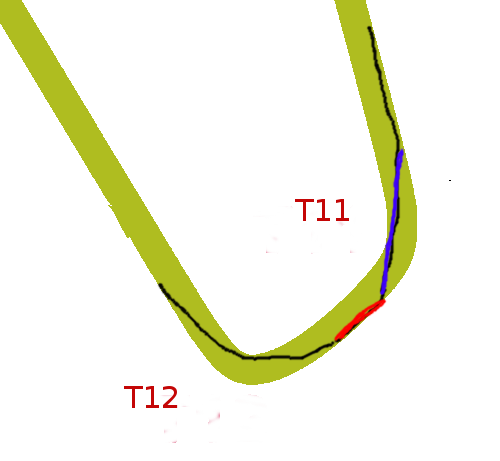
The blue line is taken under light braking, and most drivers apply a bit of throttle early on the red line followed by braking again for turn 12.
A different derivative of the smooth arc line is a line that eliminates the straight between turns 11 and 12 entirely:
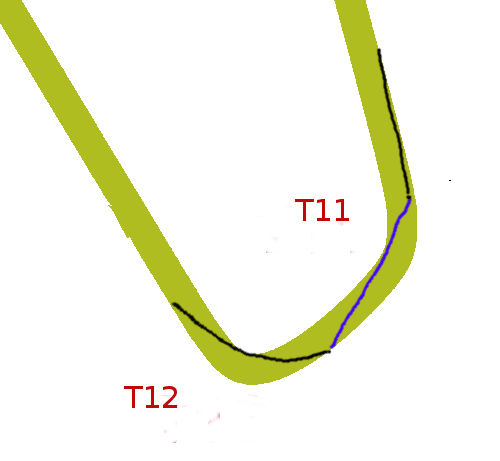
The idea here is to carry speed longer into turn 11, turn later, and brake through the entire blue line until the turn in point for turn 12.
Not all cars can run all three possible lines. Generally speaking, cars on stiffer suspension and with stickier tires have higher likelihood of being able to run the straight line approaches to turn 12. Cars on softer suspensions that roll more are often restricted to the smooth arc line or its close variations.
Drivers wishing to practice turn 12 line would be well served by running the South configuration of VIR which is much shorter in lap time than the Full configuration.
Turn 13
A jot left prior to turn 14.
Because most of turn 13 is uphill, and there is significant elevantion gain, braking zone for turn 13 is extremely short especially considering the length of the back straight. Lower power cars often start braking at the 100 marker.
The goal in turn 13 is to maintain braking pressure all the way until the turn in point in turn 14. Drivers new to the track generally brake too hard too early and then get off the brakes between turns 13 and 14. For best lap time, brake late and maintain braking the entire way up the hill to turn 14.
Turn 14
A right hander cresting a hill.
This turn benefits from trailbraking in most cars due to elevation change. It is also effectively a late apex turn - the car should come out of turn 14 facing right of the apex of turn 15.
Turn 15
A downhill left hander. Low power cars should drive through this turn at full throttle. Mid to high power cars will use partial throttle. Do not be afraid toplow the car a little through the turn.
Track out all the way right to set up for turn 16a.
Turn 16a
Turn 16 is the beginning of hog pen. Even though on the map it looks quite open, it is actually pretty slow due to the required setup for turn 16b.
Most cars should straighten their line on the right edge of the track between turns 15 and 16a to achieve a late apex entry into turn 16. The car should track out very little past the apex, almost staying on the left edge of the track, to take turn 16b with the best possible line.
High power and high grip cars often take an alternative line where they come into turn 16a much faster but do not stay all the way left at the entry for turn 16b. The reasoning for this line is the time given up on entry in 16a is not worth increased exit speed in turn 16b.
Turn 16b
In low power cars this turn is the begininning of the front straight, and as such exit speed is of paramount importance. Turn 16b should be taken as a late apex corner, with the goal being to apply full throttle at the apex.
Higher power cars, especially if they are also grip limited, may not fit into turn 17 regardless of their line in 16b if they go full throttle before the apex in 16b. In such cars it makes sense to take turn 16a faster and take turn 16b more conventionally.
Regardless of the car, the earlier the driver can get on throttle in turn 16b, the better their lap time will be. In just about anything the car should be full throttle by the midpoint between turns 16 and 17.
Turn 17
Turn 17 is an opening right hander. It is a non-event in low power cars and an important corner in high power cars. Look at the end of the exit curb on the left while in this corner to gauge your speed and power application.